Knolbar Led Display Installation and Programming
An installation guide of the Led Display is being given below for easy reference while you install the Led Display for the first time. The guide will take you through the installation step by step, point by point.
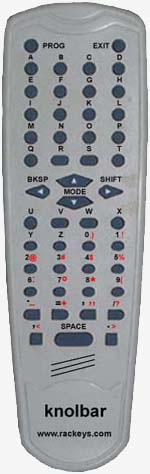
The Knolbar Led Display from Rackeys has one great advantage over many other displays that you get in the market. While in those displays the message is programmed either through a computer or a keyboard, Rackeys Led Display comes with a remote control through which one can program the Led Display. Remote control programming is easy, and one just needs to tap remote control keyboard to fill one’s message.
Installation:
- Take out the Knolbar Led Display from the carton.
- Place the Led display on the table.
- If you want to mount the led display mount it by using mounting brackets.
- Procure a standard 12 volt adapter, minimum 500 miliamperes.
- Peel off the protective paper sheet, until you see the clear plexiglass. The correct way of peeling the paper sheet is to hold it from one side and pull gently. It will come off plainly.
- Apply 12V DC power
- Led display will start displaying standard message - RACKEYS.
- Take out the remote control, and fill it with two triple AAA batteries.
- Now you are ready to program your first message into the led display
Programming:
- Switch on the display board.
- Point the remote control towards the Led Display.
- On switching on, the led display will display RACKEYS for 10 seconds. Press the PROG button on the remote control during this period.
- When the Led display enters the programming mode, the display becomes clear.
- Now you can enter your message from the remote control by pressing the corresponding buttons.
- You can fill 8000 character message.
- Different modes like, Blink, Stop, Typing, Falling, can be selected from MODE button
- The SHIFT key have been provided in the Led display for inputting different symbols. For example + - $ %
- BKSP button is for deleting a character or the message.
- After the message has been programmed, one can exit from the programming mode by pressing EXIT button.
- After exiting from the programme mode, the Led display restarts.
- Your current message will be displayed.
- You can programme it as you wish.
- Mode 0 - Normal Scroll Mode
- Mode 1 - Stop Mode
- Mode 2 - Blinkibng Mode
- Mode 3 - Typing Mode
- Mode 4 - Falling Mode